TL;DR: We present the details of Poolside's code execution environment. We first describe how we pull in repositories from the outside world into Saucer, our revision serving system. We then discuss our approach for automatically converting repositories into images, including our use of AI agents for this task. We also discuss how we efficiently represent multiple revisions by using layers, and how we serve code execution requests at scale.
Introduction
In our three previous posts in the Model Factory series, we’ve discussed everything from data ingestion to pre-training. Now that we have the data and a pre-trained model, we can begin to think about how we can specialize our model for coding-centric tasks.
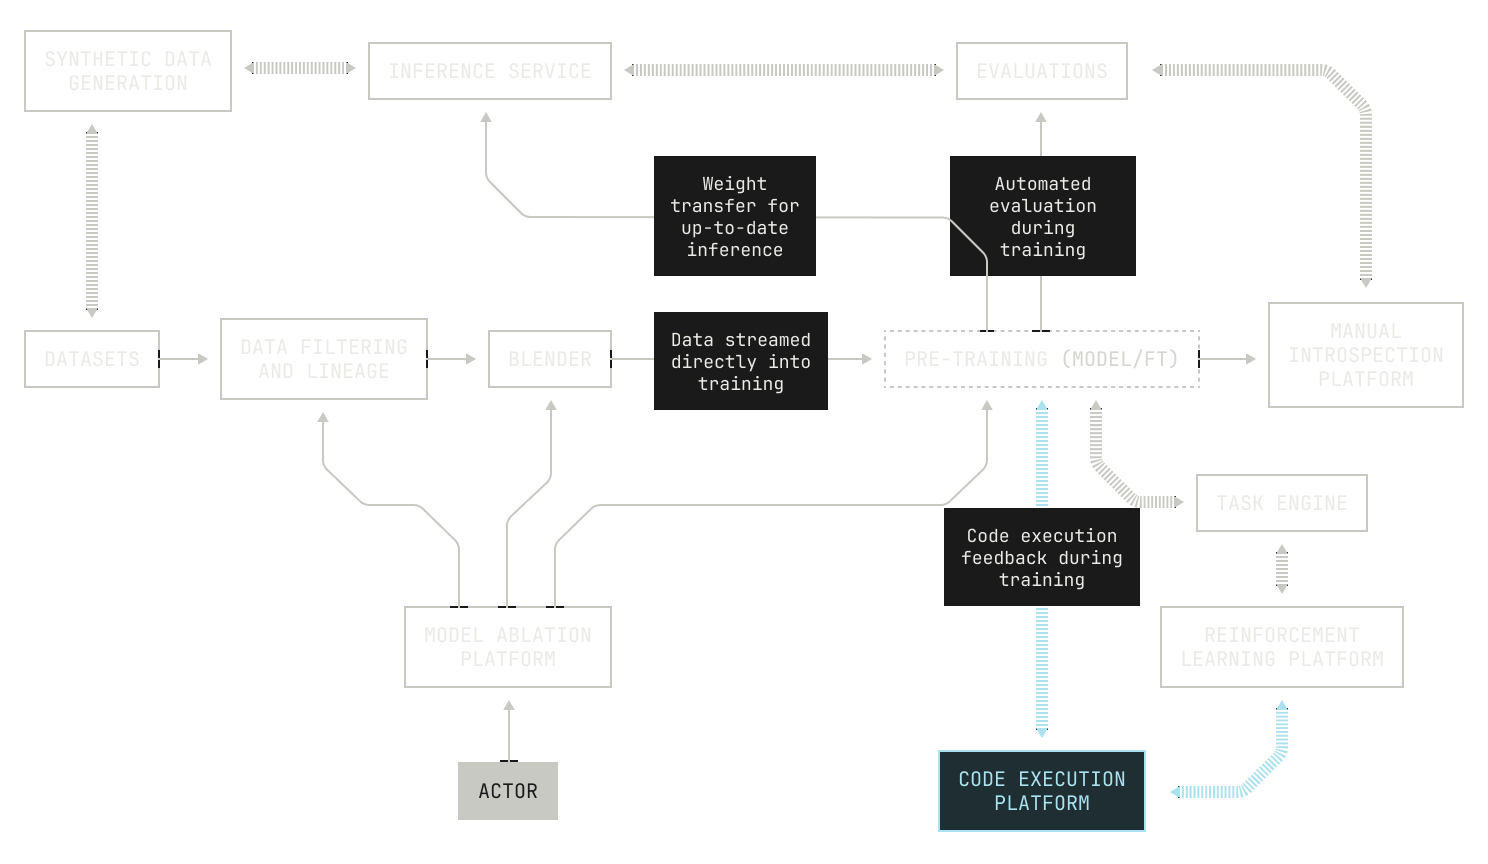
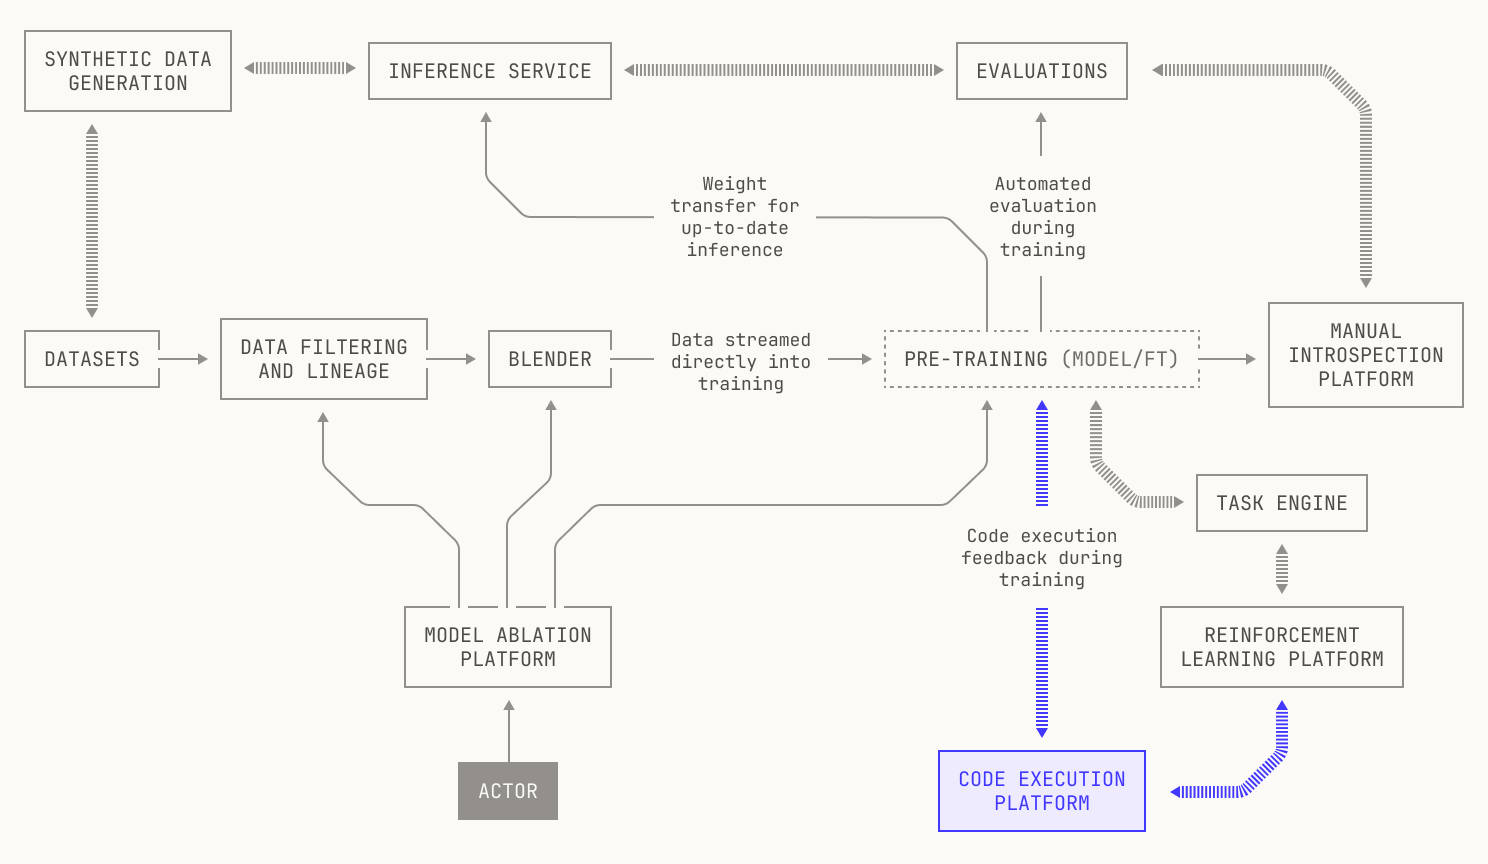
One of the key ways that we achieve coding specificity at Poolside is by allowing the model to learn from code execution feedback, known as Reinforcement Learning via Code Execution Feedback (RLCEF). RLCEF has been one of our key innovations since we founded Poolside in 2023, and we've invested heavily into this approach. In fact, we continue to pioneer new improvements in this area, and we strongly believe that using RLCEF will allow us to push beyond the limitations of current pre-training data (for more on this, see our research statement).
However, in order to explain RLCEF in more detail, we need to explain how we actually produce code execution feedback for our models.
In this post we present the details of our code execution environment. We begin by discussing why we need to build repositories into containers at all, and what this step actually gives us.
We then describe the process of pulling repositories from the outside world into our own revision serving system, known as Saucer. Then, we'll discuss the details of how we build repositories into images, including our use of AI agents for hard-to-build repositories. We also discuss how we efficiently handle repository revisions by using image layers, and how we serve code execution requests at scale.
Interested in building machines for Poolside's Model Factory? We'd love to hear from you.
→ View open rolesA ten-thousand-foot view of our code execution platform
Before we get into the details of our code execution platform, it's worth taking a broader view of how the full system works. Indeed, taking this viewpoint will help us to understand why we made certain design choices in our code execution platform, and how these decisions help us achieve our aims during model training.
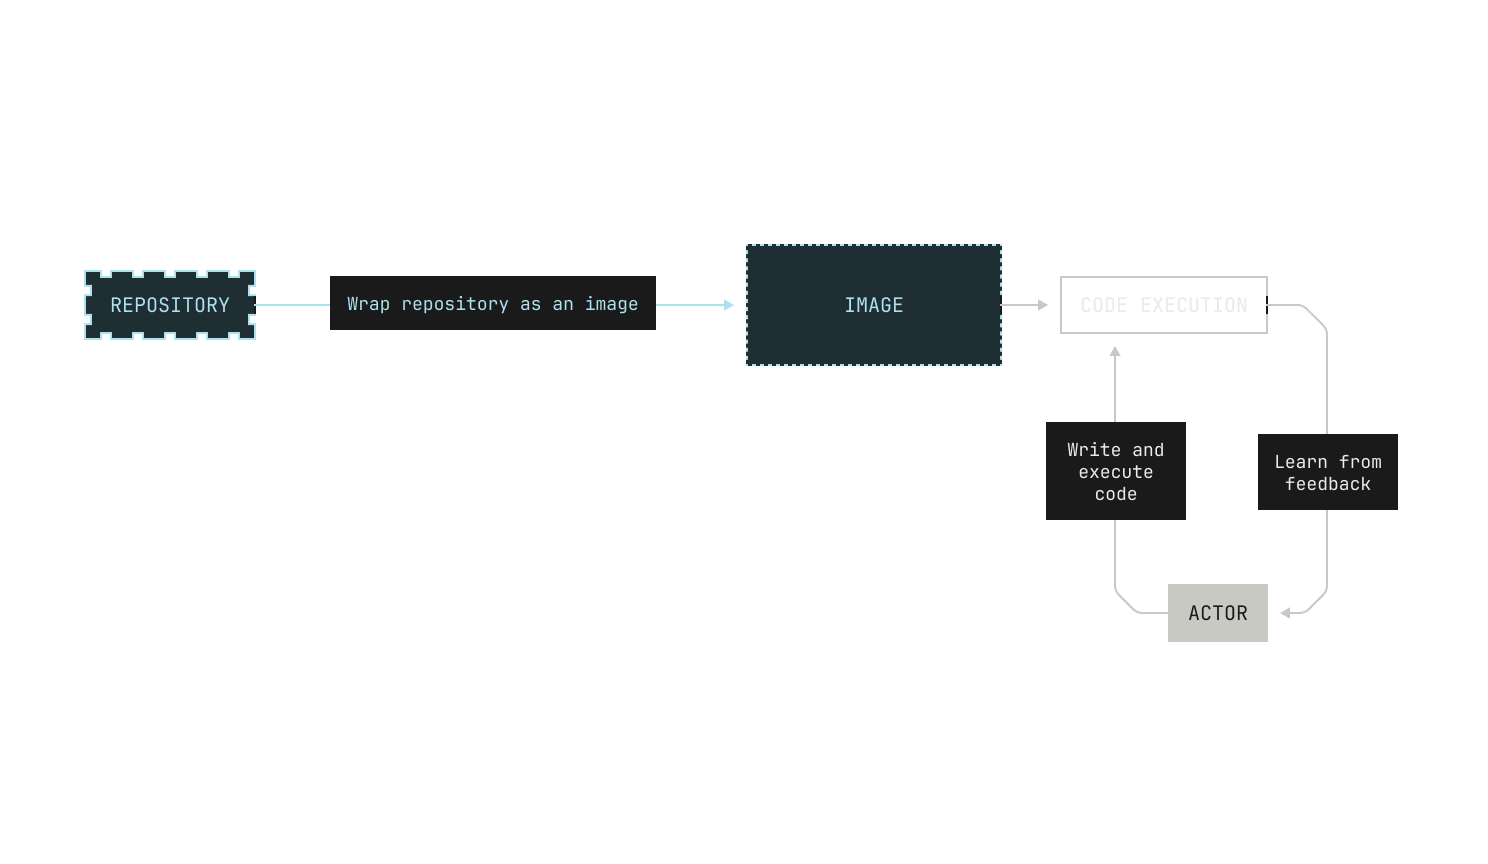
As a reminder, the high-level goal behind RLCEF is to enable a model to learn about coding by learning from code execution feedback. Intuitively, we simply want to enable models to learn to write code in the same way that humans learn to write code—not just by reading the code of others, but by learning deterministically from writing programs, running tests, inspecting compilation errors, and other software development workflows. Going further still, we would like to enable the model to write and execute code with the goal of solving a task against a particular repository, just like how a software engineer would in the real world. This gives us the following high-level picture of what we need:
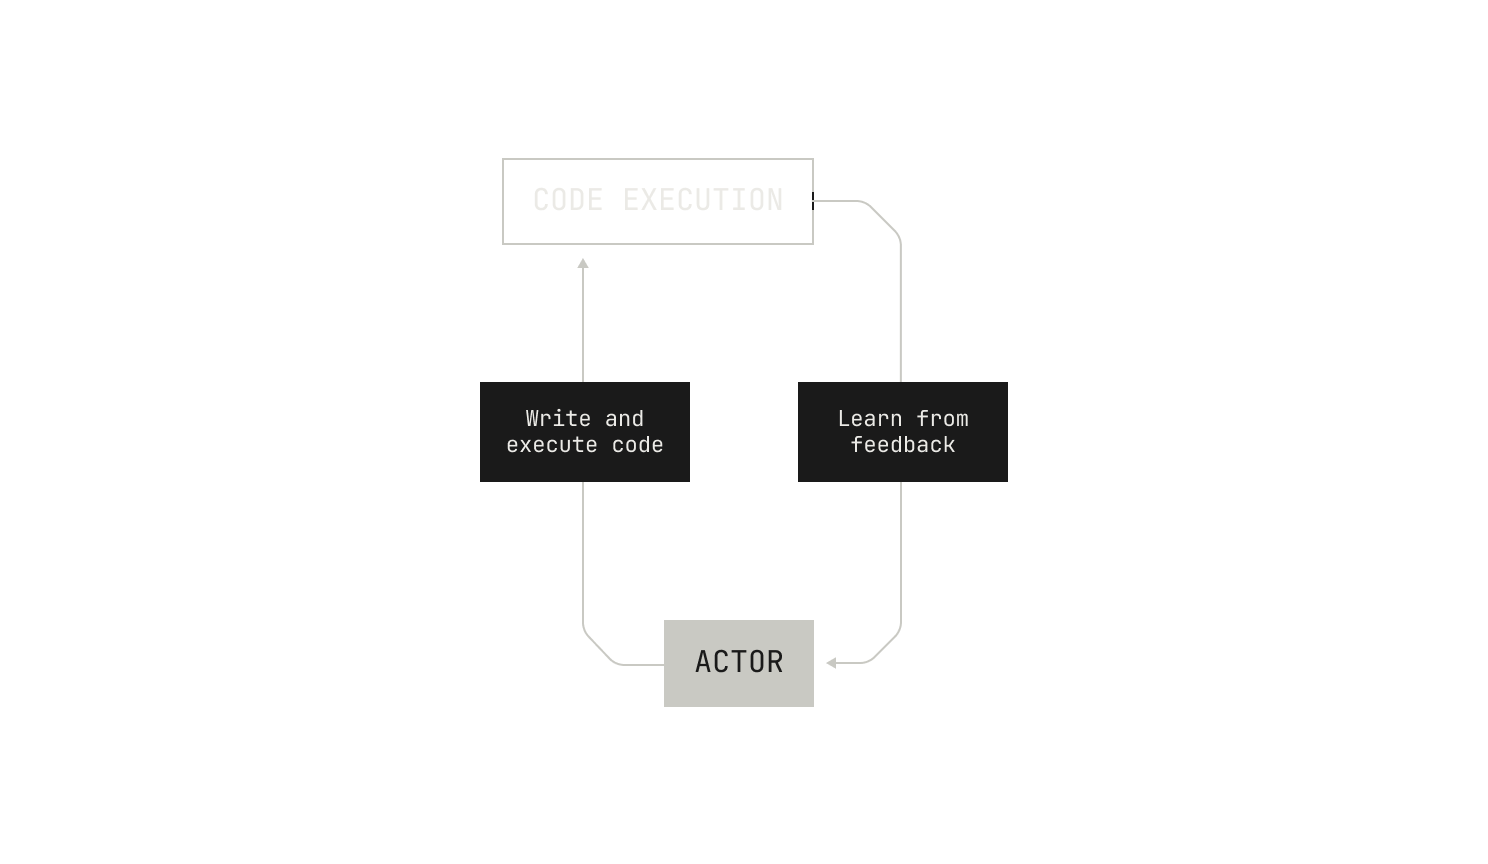
Even with these high-level goals, we also have some operational concerns. On the one hand, we all know that long feedback cycles slow down software development. The same is true of training models from execution feedback. This means that we need to proactively avoid anything that would slow down the speed at which the model can learn from code execution feedback; taking a long time to execute code is a non-starter. On the other hand, the model needs to execute code in a secure, isolated environment; we want to make sure that the model doesn't have any knock-on effects, and we also want to make sure that the model learns only based on what it actually sees. But there's even more than that: we need to be able to actually execute the code in a particular repository. This includes knowing how to execute the test suite of a particular repository, and how to compute the test coverage of the repository. Additionally, we would ideally provide a narrow work surface for invoking the code in the repository: we do not want to burden the model with the details of how the code is actually executed. Instead we simply want it to learn from the feedback associated with executing the code. This also needs to happen in a secure and isolated environment.
Practically speaking, we don’t want one particular instance of a code execution task to interfere with another, or with the rest of our code execution service. Going further, we would prefer not to restrict ourselves to a particular repository revision: we also want to be able to switch between revisions, without unduly burdening our storage system for repositories.
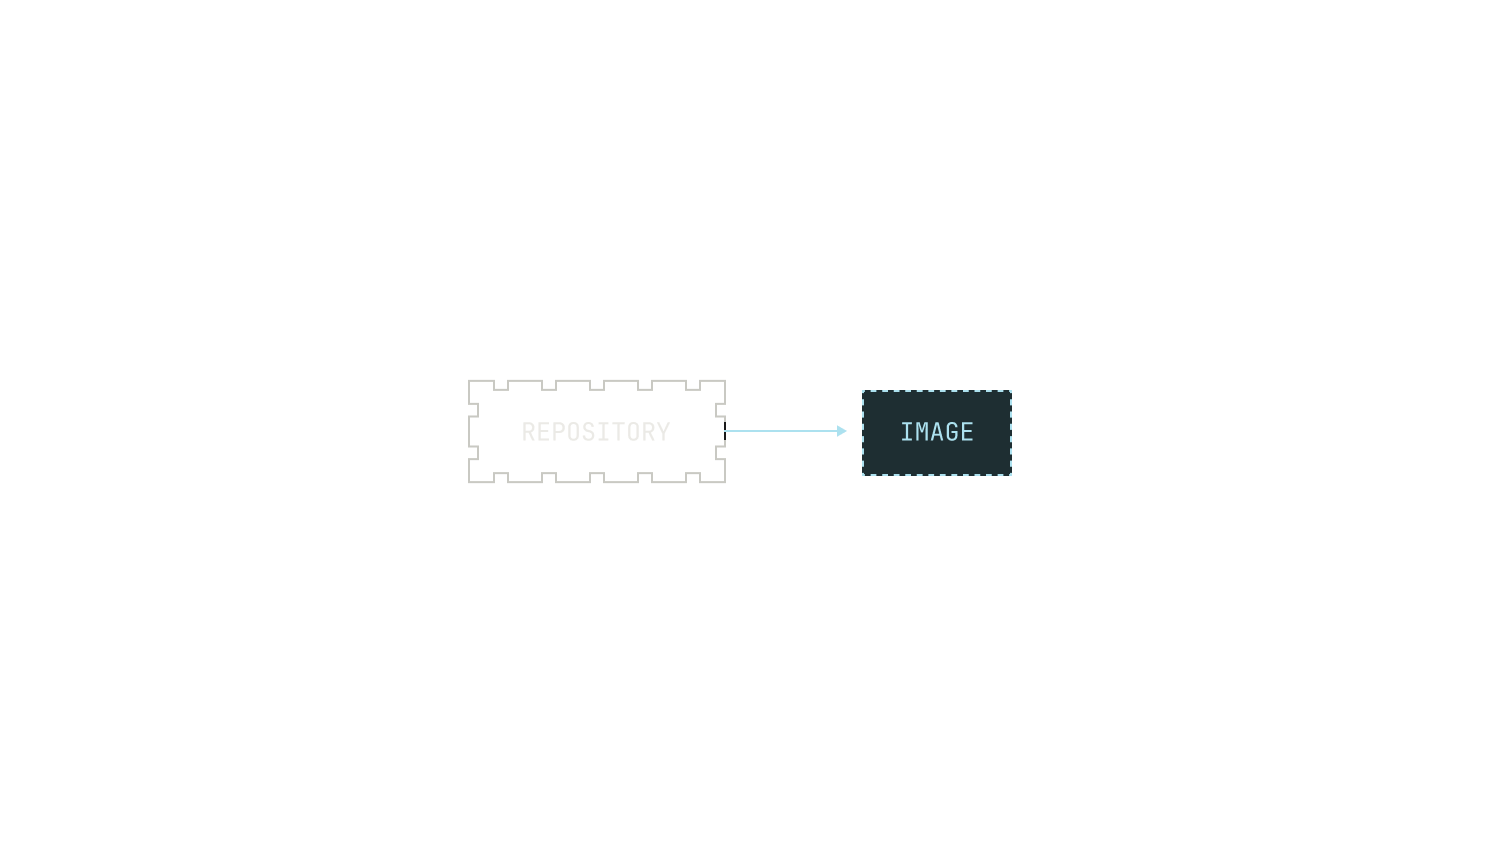
Let's tackle the first requirements first. Very few software projects are truly standalone. Indeed, most software projects will have dependencies of some kind, or environment requirements that need to be satisfied before the project can truly be deployed. In other words, we need to provide a reproducible environment for every repository that we want to use for RLCEF. To do this, we build an image for every repository that we want to use. We'll dive into this further in this post, but for now we can think of an image as a full execution environment for a particular software project. Notably, an image holds all of the dependencies for a particular project, enabling easy and unedited execution. We note that using images for code execution confers other benefits too, such as concise storage and easy versioning.
Given we have hundreds of thousands of repositories in our code execution environment, we need a fully automated way to build images for arbitrary repositories. Furthermore, we need to be able to automatically build images for almost any repository revision, too. This leads to the following picture:
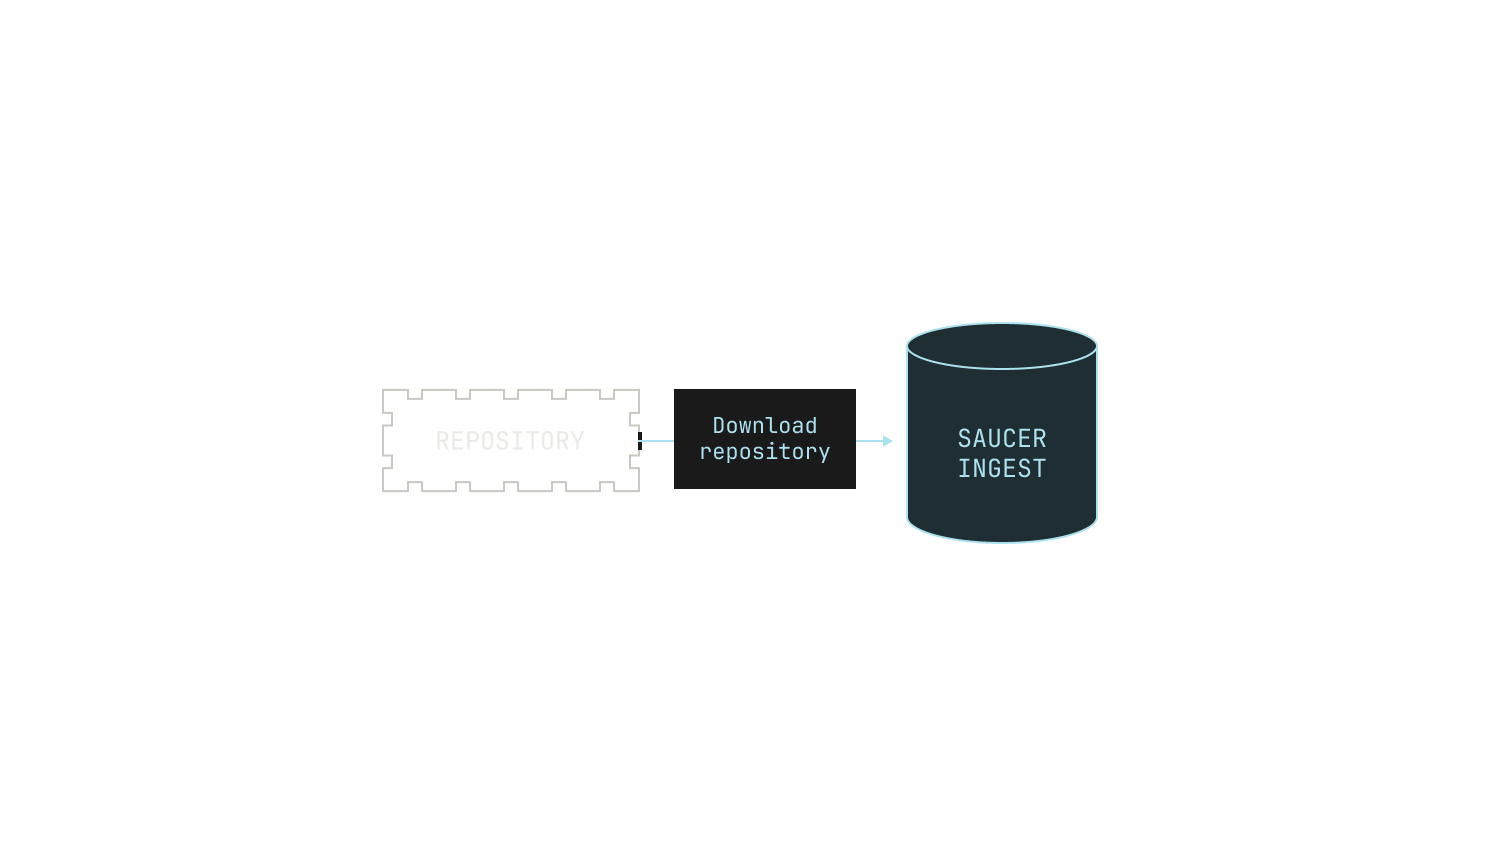
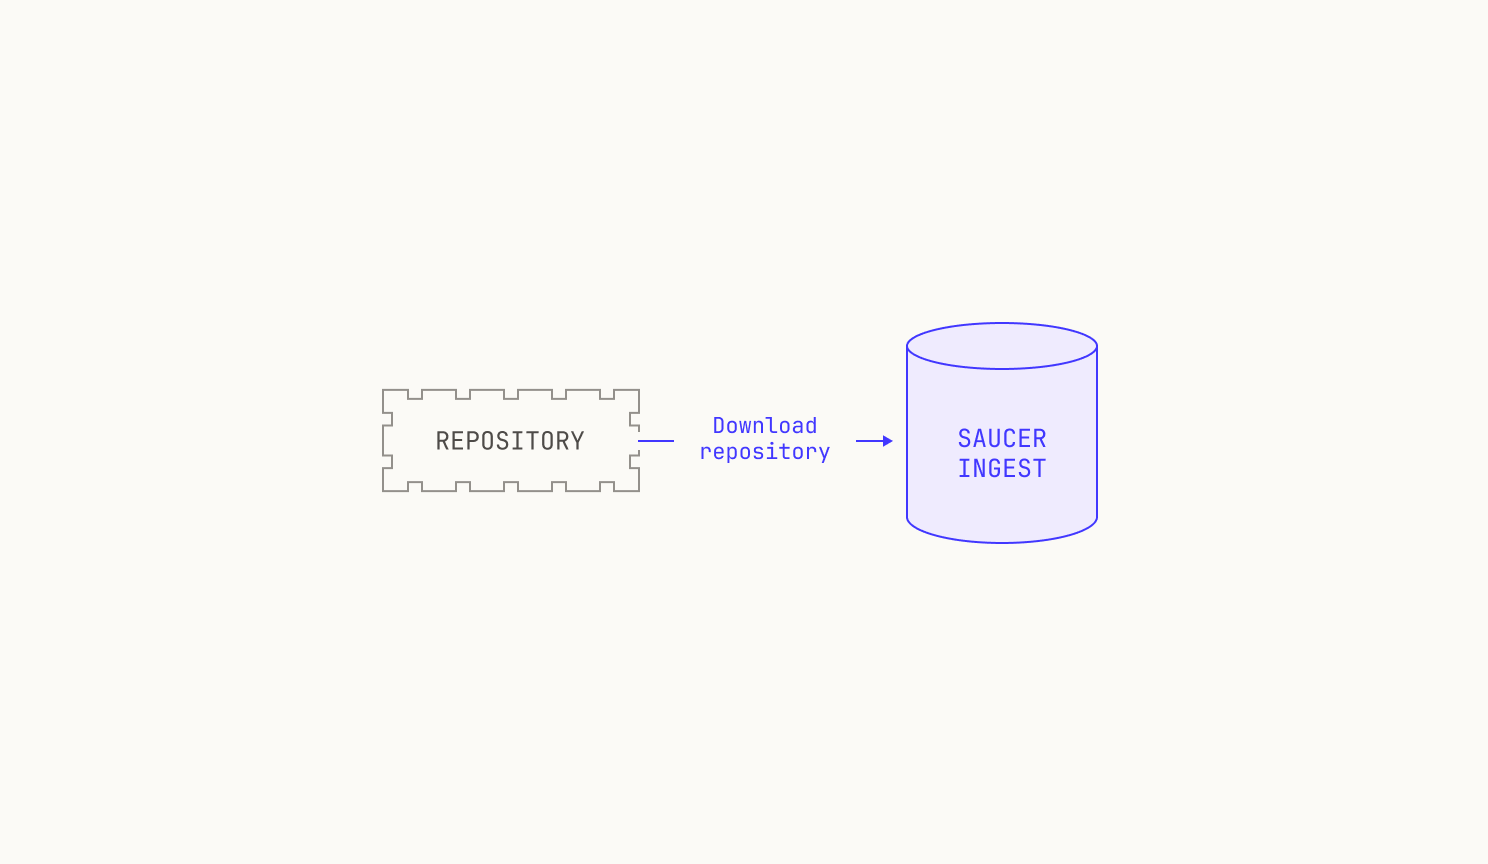
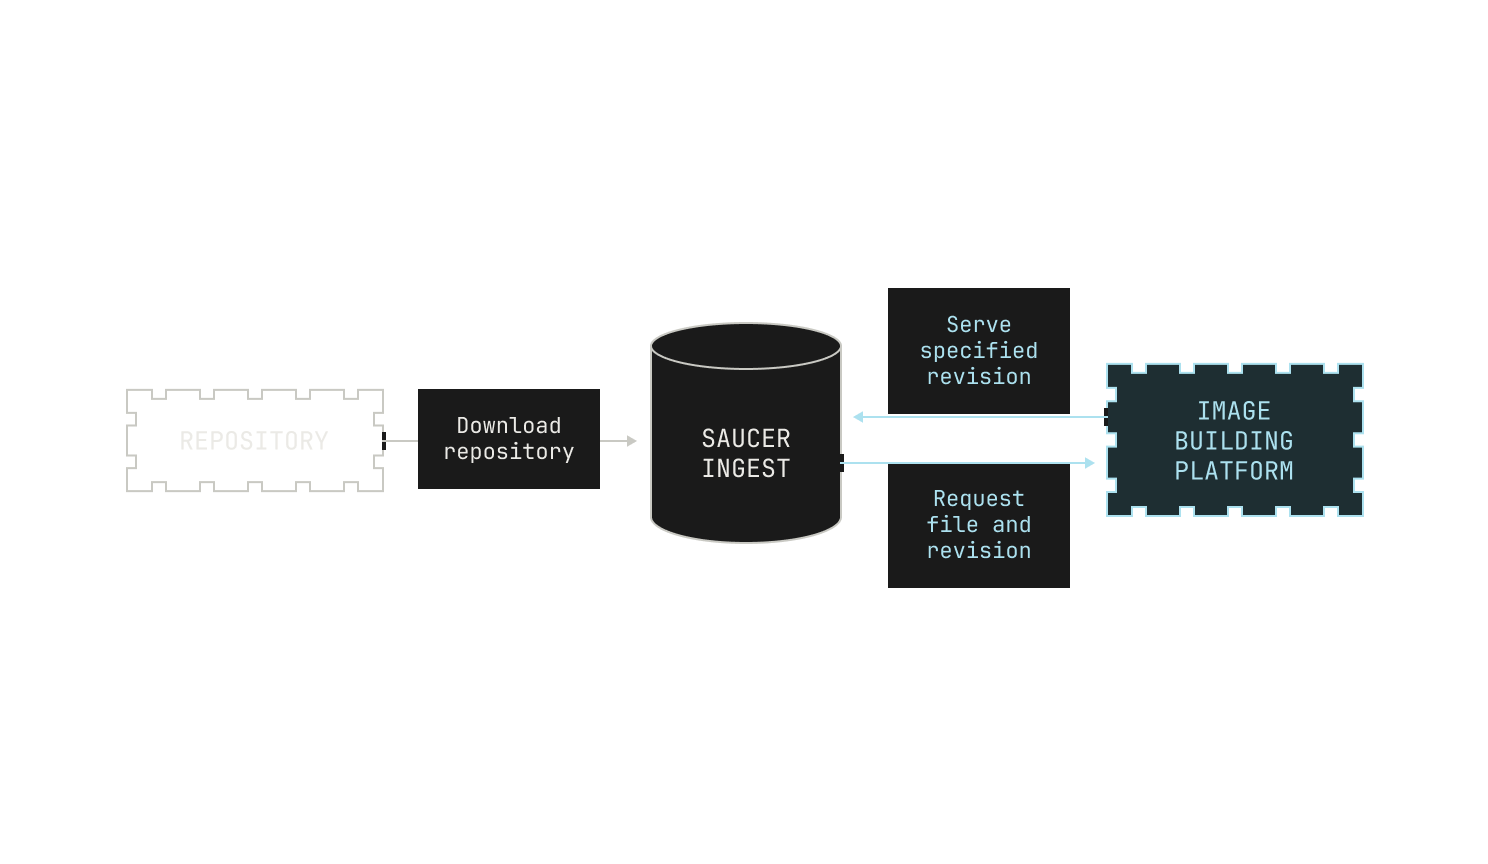
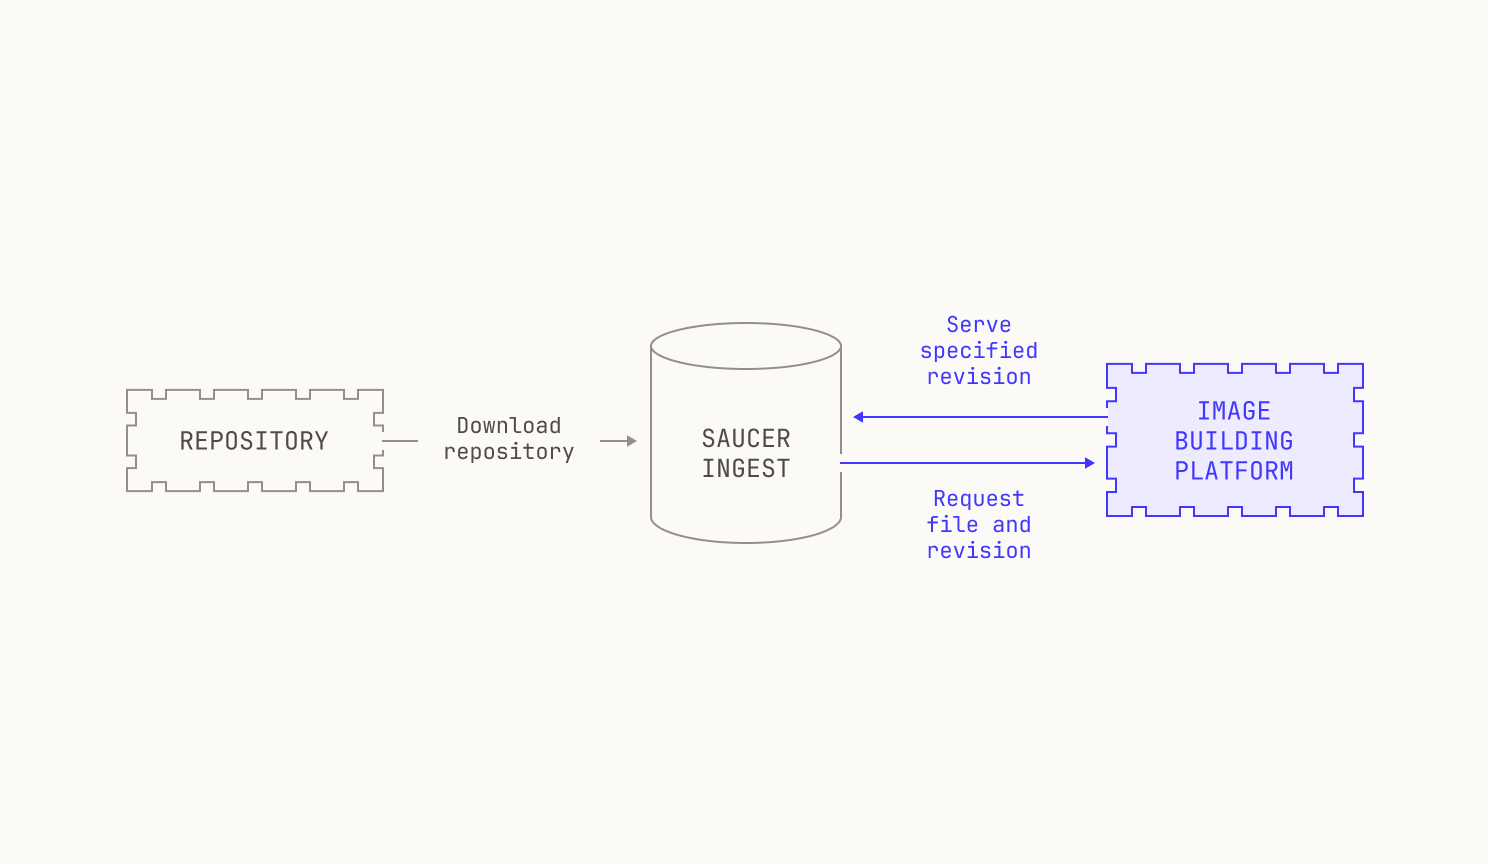
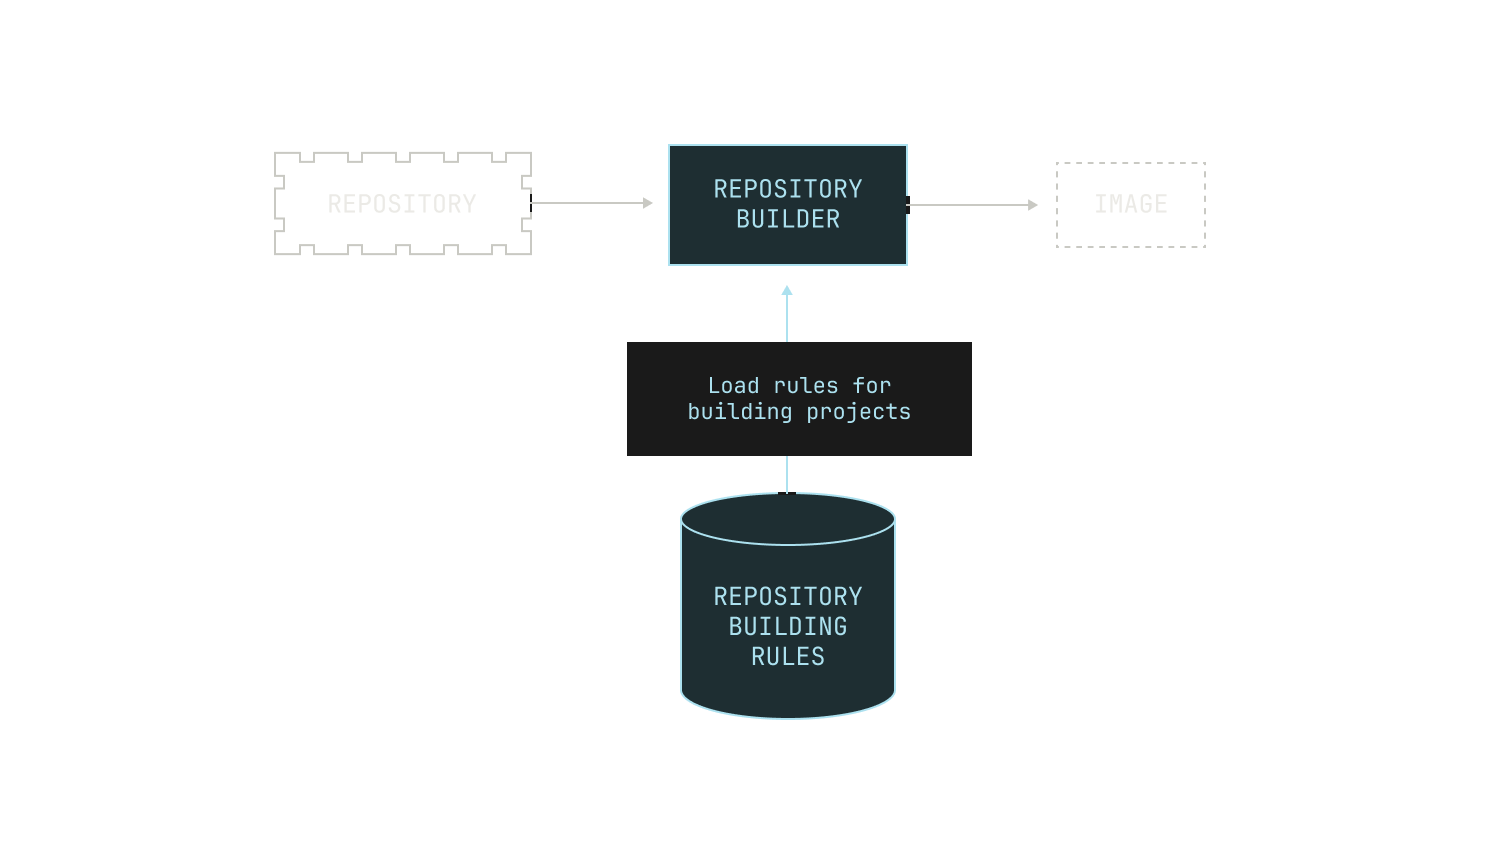
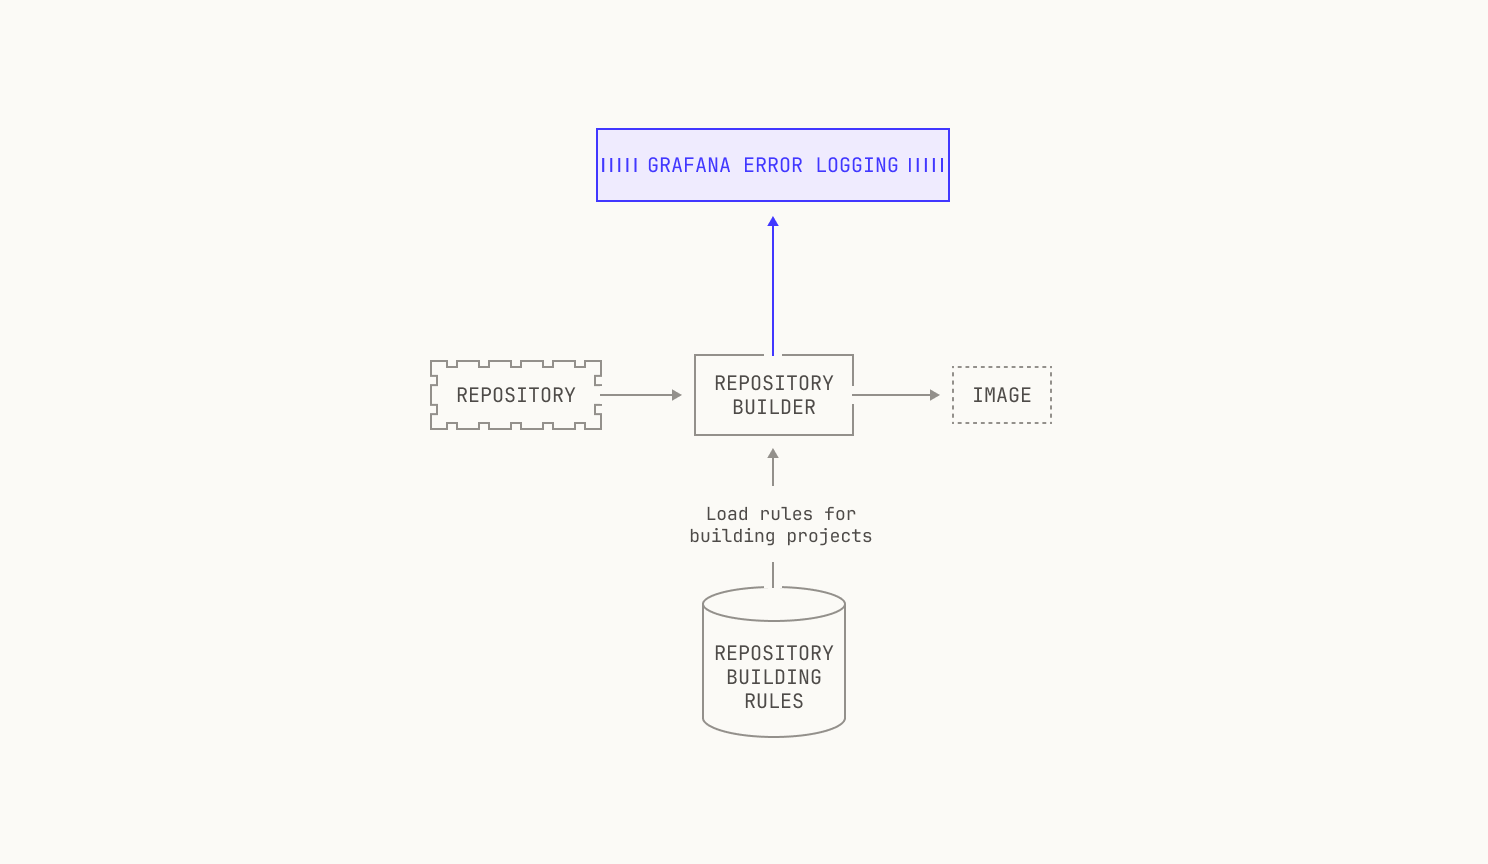
As previously mentioned, we need to be able to build images for almost any revision of any of the repositories on our code execution pipeline. At present, we have over 800K repositories indexed, and so handling all of these revisions is no small feat. This requires us to carefully ingest repositories from the outside world and store any built images efficiently. We do this in two steps. First, we pull repositories to—and serve repositories from—an internal service, known as Saucer. Notably, Saucer is designed to provide high-throughput serving across multiple physical nodes. Using Saucer enables us to avoid rate limitations on third-party services, as well as allowing us more control over the repositories that we serve. We then read our target repository from Saucer and build the corresponding image, leading to the following workflow:
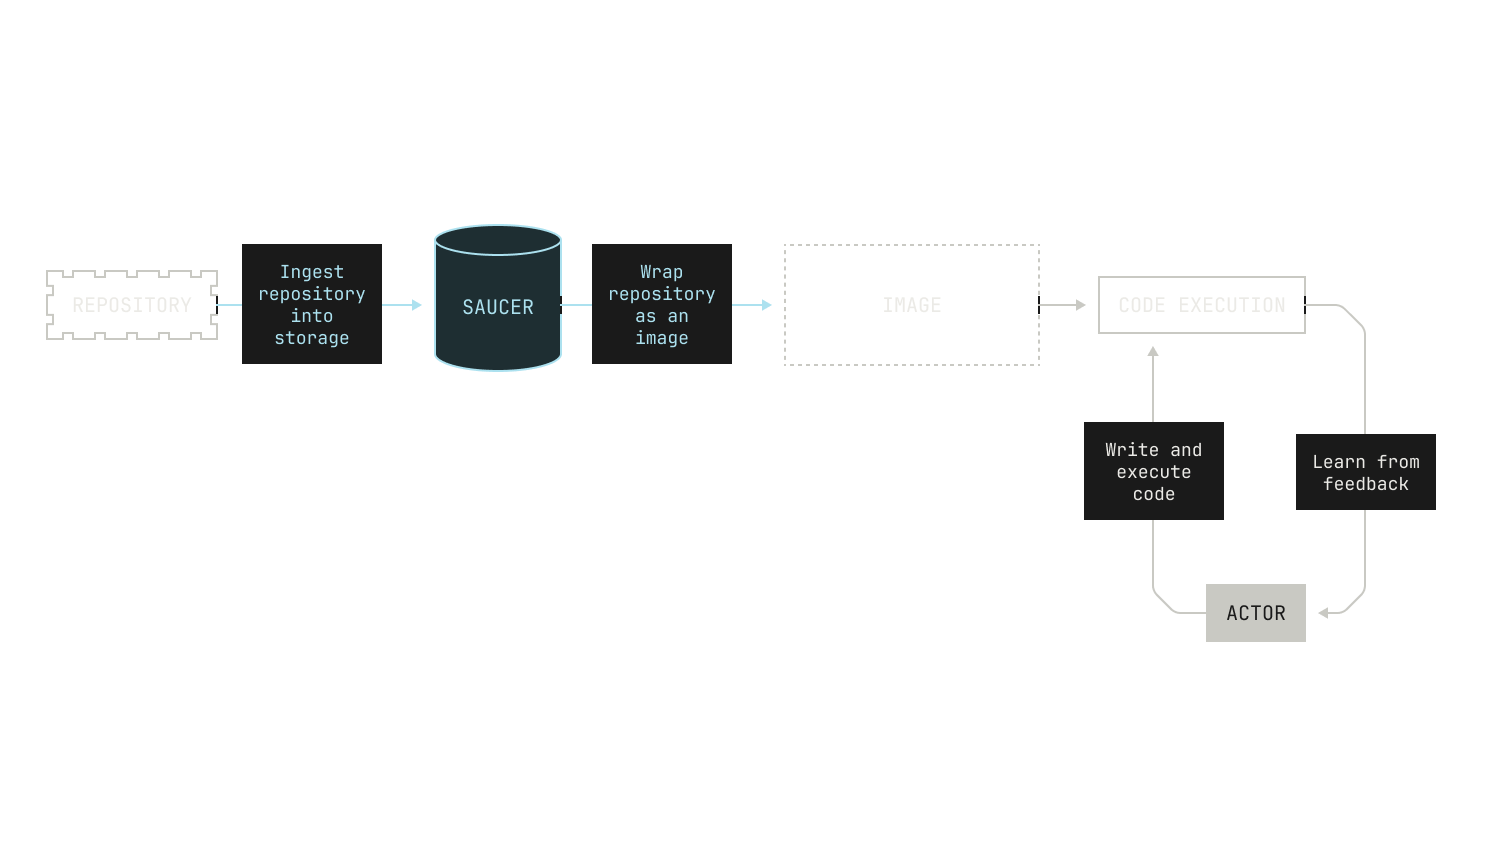
Although this description is somewhat brief, we can already see that it provides a sufficient environment for mapping otherwise inert repositories into a format that we can use for code execution. We’ll now describe each piece in detail.
Saucer
As we mentioned, the Model Factory contains a repository hosting service, known as Saucer. At a high level, Saucer enables us to have efficient read access to any file, at any revision, of a repository in our code execution environment. Although the focus of this post is building entire repositories, we stress that being able to pull any file at any particular revision is a very useful feature in its own right for model training.
Saucer's main purpose is to efficiently serve ingested repositories to downstream services. In order to do this, Saucer provides two gRPC endpoints for applications to invoke. The first of these is a simple service that retrieves files from a particular revision of a repository; the other service provided by Saucer allows a Saucer deployment to ingest a new repository from the outside world.
Ingestion works as follows. We first push the location of the repository that we wish to ingest to a Kafka topic. Notably, we use Kafka for this task because it enables us to easily rebuild Saucer from scratch, as we can recreate all of the ingestions by simply rereading the entire topic again. Once the repository’s location has been appended to the Kafka topic, Saucer automatically picks up that a new job is available and begins ingestion. The process of pushing to Kafka is somewhat manual, but this is by design. Practically speaking, this is because ingesting repositories can cause downstream changes—especially to models that are in the process of using Saucer—so we exercise extra care here. Still, manually triggering a Saucer ingestion is hardly difficult, with typical ingestions taking only a few minutes to schedule. Under the hood, all of our Kafka deployments are powered by Redpanda, an excellent Kafka compatible system that offers best-in-class performance for us and our workloads.
Once an ingestion has been triggered, Saucer will attempt to download the repository. As with any distributed system, this task can fail for any number of reasons. In practice, we follow a two-stage download process: we attempt to download the repository using parallelized runners, but in case of failure we drop down to a single, non-parallelized worker. In cases where the single worker fails, we simply log the error and skip downloading the repository (i.e. we don't continuously re-attempt the download).
After the repository has been downloaded, Saucer repacks the repository in a download-friendly format. Intuitively, we expect to read from Saucer many more times than we write to Saucer, so we take extra care to pack repositories in a read-friendly format. In the case of Git repositories in particular, we pack the repository by using a Git packfile alongside an index file, allowing us to have easy access to any file in the repository. Again, this step requires care, as there are many reproducibility pitfalls. For instance, Git packfiles do not pack files deterministically, leading to different packfiles across different runs of the same ingestion. This non-determinism can lead to issues later on if we were to, say, recreate the packfile independently from the index file. All of these details add up to a fairly complicated system that we've evolved over time.
Above all, Saucer provides a useful service in the Model Factory. Outside of enabling us to easily scale experiments—after all, we control the whole pipeline—we can also use Saucer to provide detailed file information to other downstream services, such as some post-training pipelines. In fact, we can even deploy a Saucer server and allow a model to rewrite the history of a particular repository, allowing us to teach a model to handle even more complicated tasks.
Building images
Now that we've got our target repository in Saucer, we'll discuss how we actually go from a repository to an image. At a high level, our target workflow might look something like this:
To begin, let's reason from first principles about how we can build an arbitrary software project. Concretely, let's imagine that we've decided to build an undocumented repository at a particular revision. How might we actually do this?
Well, we might have some context clues from the repository that we're trying to build. For example, a Rust repository will almost certainly rely on Cargo for building, and thus we simply need to use the repositories' manifest to build the repository. We're able to deduce that we need to do this without needing to read any build instructions—all of our deduction has come from the structure of the project and from other context clues. There's other examples of this in the wild. For example, Go projects are typically built via a standardized build system too, and Python projects are also wrapped with pyproject.toml files. Thus, we can typically deduce—albeit heuristically—how we build certain projects depending on context clues. If we add that step to our workflow, we end up with a workflow like this:
In a sense, languages with standardized build systems provide the "easy" case, because there are only a few rules. This is not always the case: there are many build systems in the wild for C and C++ projects, across multiple operating systems. So we need to find a way to define build rules based on the systems that we find, and not based on the language itself. Still, this can fail in arbitrary ways. We might encounter a project that simply isn't buildable via a set of known rules, or we might not have covered all of the behavior that a particular build system offers. In these circumstances, our initial heuristic step may fail. To account for this, we record the reason that a particular project might fail—either based on the build system type, or based on a missing rule—and push the results to a Grafana dashboard. This is useful because it enables us to later dig into why this failure happened, and how we can resolve it the next time around. We also need to keep track of the fact that multiple build systems might be present: for instance, some repositories will contain both Makefiles and a CMakeLists.txt file. Building based on the former isn't likely to work, but regenerating the Makefile based on the latter probably will work.
Still, just because we know how to build a project doesn't mean that we will actually be able to build the project. If we return to the C++ example from earlier, we might miss certain build dependencies if these aren't properly specified somewhere programmatically. This can happen if the dependencies are actually specified in a human readable format, say, in the README, but not in a build script. Again, we log these errors to Grafana and move on to another project if there's an issue.

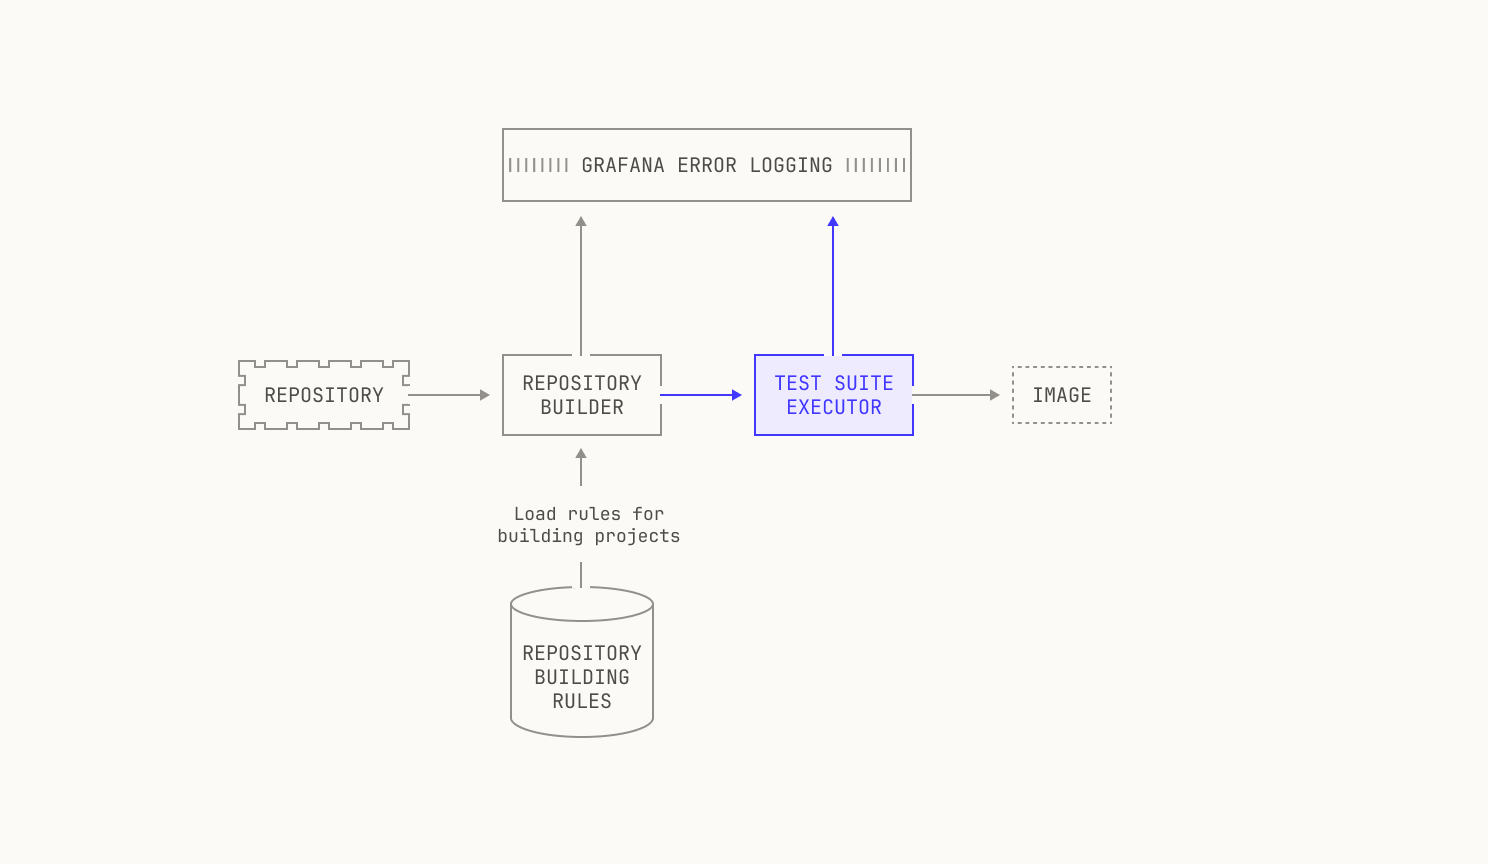
Once we've figured out how to build the project, we also need to run the project's test suite. This is primarily for enabling downstream tasks: we cannot easily judge how well our RL code works if the test suite fails in the first place. Again, we need to know how to actually run the test suite, which again changes based on the language. We track this with static rules in a similar manner to how we handle building, which is very useful. Similarly, we track the errors in test suites and push them to Grafana in situations where we fail to run those tests. We also allow the builder to ask for the test coverage of the execution: intuitively, this is to also allow downstream tasks to work properly. If we didn't do this, tasks that are based on improving test coverage wouldn't be workable for a variety of reasons.

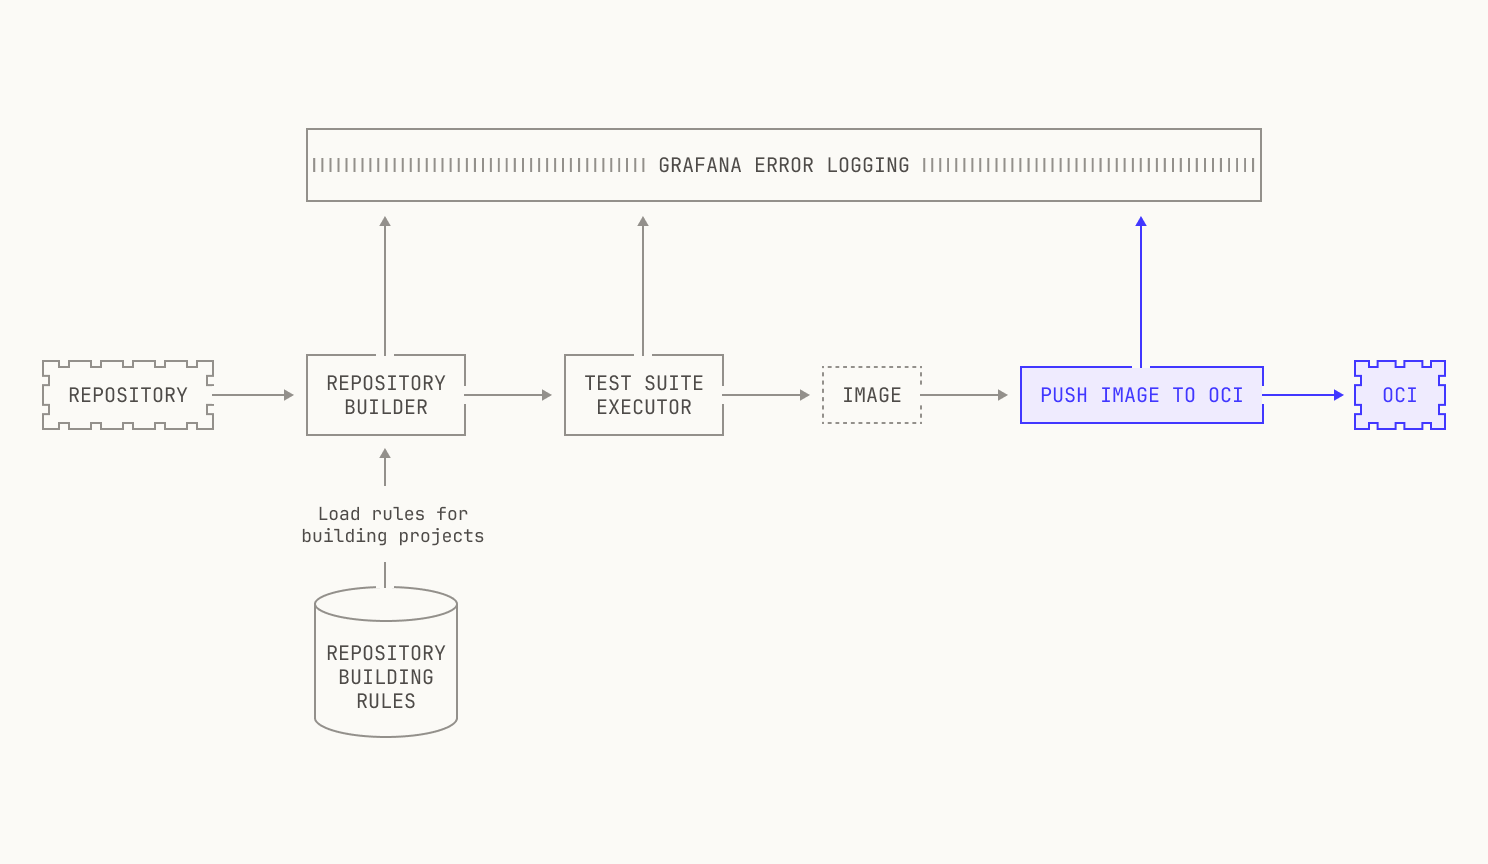
Lastly, we can now actually push the produced image into an OCI image registry. For scalability reasons, we operate our own OCI image registry instance, with the underlying storage provided by a simple S3 bucket. This setup allows us to utilize optimizations that are typically outside of a usual OCI setup. For instance, rather than reading images directly from the registry, we have an optimization that allows us to read image layers directly from S3. This particular optimization has the benefit of allowing us to concurrent image requests more easily and gives us fewer points of failure. Notably, these optimizations do not add to the complexity of adding new images to the OCI registry, and this step is thankfully much more straightforward than the previous steps. We won’t go too much into the details here, but it’s important to note that this step can still fail—it's an operation over the network, after all—and thus we also keep an eye out for errors here, too.
This entire process isn’t foolproof, or even particularly close to what a human would do. For example, the system described above does not have the ability to interrogate README files at all: all of the deduction is handled heuristically based on the files in the repository. Moreover, although the system described above attempts a "best case" build, it's not very robust: we simply try to match rules against the repository that we're trying to build. This is very different to how a person might act. For instance, an experienced software engineer would first try to read the instructions (if any), attempt to build the project, and then iterate on any failures until the project is built. Sadly, our static rules don’t mimic this approach perfectly, and our static rules-based system simply gives up when there’s an error.
To circumvent this issue, we now augment our building system with an agent that we trained to build projects. Unlike our static rules, the agent is capable of understanding READMEs, calling external tools to gain additional context, and iterating on previous build failures. We've seen quite a large improvement from using the agent to build images, especially in the case of C++ projects with complicated dependencies. For us, this is a particularly exciting development; after all, we now have an agent that was trained in the Factory working to improve the Factory.
Handling revisions
Since we’ve now built images from repositories, we can turn our attention to how we handle revisions. As a reminder, a repository in a version control system consists of several revisions, or commits, with each commit representing the repositories' state at a particular moment in time.
Different version control systems handle commits differently. For example, the Git version control system stores a tree object that captures the full state of the repository for each revision. A commit object references a particular tree object. Because we have tree objects for each revision, we can compute the differences between two commits-–known as the diff—by computing the difference between the two tree objects.
We use a similar approach for our images. To explain this idea, we need to explain how the OCI specification defines images. Briefly, an image is defined as a collection of "layers" and some associated metadata. In this context, a layer is just a collection of files that are stored in some particular way. Notably, the filesystem associated with each image is the union of the layers that make up the image. From this viewpoint, a layer can be viewed as a portion of a filesystem that we overlay on top of previously unpacked portions of the filesystem. This turns out to be a very useful abstraction. For instance, we can define an operating system as a base layer, and then simply apply any image-specific changes on top as a new layer.
If we squint slightly at these two systems—version control revisions and layers—we can see that they're very similar. First, we know that version control revisions are typically represented as diffs between sequential commits. On the other hand, layers are applied sequentially on top of each other to build an image's filesystem. This leads to the following insight: we can simply represent a diff between commits as a different layer in our image. Admittedly, this insight is an oversimplification; for instance, OS-level dependencies may differ across a project’s repository, as well as other build artifacts. For the sake of brevity we’ll omit the details of how we handle these additional details, but at a high level we first attempt to build a single revision of the repository, and then we use the resulting image as the base image for subsequent revisions. The net result of this approach is that the new image layer for each revision only contains changed files and the deltas from dependencies and build artifacts, leading to a relatively thin OCI image layer per revision.
We now turn our attention to how we actually implement this idea. First, layers are typically unpacked in an image by using Linux's OverlayFS filesystem. Similar to the approach described above, OverlayFS builds a filesystem unpacking several mount points into a singular mount point in the filesystem. Remarkably, this is all we need to handle multiple revisions: we simply map diffs to different mount points and allow OverlayFS to handle the rest. We note, though, that we’ve implemented various additional optimizations on top of OverlayFS. For instance, we do not build a new layer for every possible change, as some changes (like metadata changes) aren’t sufficiently meaningful to mandate a whole new layer. Our system for building images handles all of these low-level optimizations for us, allowing us to produce compact images for repositories.
Treating revisions as layers provides us with many useful advantages. Namely, we’re able to avoid a quadratic storage requirement for handling revisions: we can simply store one, layered image rather than storing a different image for each revision. Moreover, retrieving a particular image is still quick, as we only need to specify which commit we're interested in and our overlay system handles the rest.
Lastly, we briefly mention that we have an optimised storage system for the images themselves. Intuitively, we are likely to use an image many times once it has been built, but we only build a particular image once. Thus, rather than use a regular storage system, we store images in a read-optimized format and system. This approach dramatically reduces the time that it takes for us to deploy images in practice.
Handling execution
Given that we can now build images and their revisions, we’ll go into the details of how we actually operate our code execution service. For the sake of this section, we’ll ignore all of the model-specific pieces of the execution; instead, we’ll solely focus on how code execution actually proceeds.
The code execution service provides a high-level API that allows users to start sessions. Each session is tied to a particular OCI image in our registry, with each image built as we described in the previous sections. Once a session starts, users can perform a wide range of actions. On the one hand, we allow users to run low-level operations on an image, such as file system changes or executing arbitrary commands. On the other hand, users can also execute much higher-level tasks, such as executing all of the tests associated with a particular project and capturing test coverage in a unified format.
So far, we’ve used the term “user” to describe interactions with the code execution service. In the Model Factory, the “user” is typically a model that’s learning via RLCEF. As a result, we cannot rely on ad-hoc methods for interacting with the code execution service; instead, we need explicitly specified APIs for interaction.
A model can interact with the code execution service in two ways: via the endpoints that are provided directly by the code execution service, or via the abstractions that are provided by our Task Engine. First, the model can interact directly with the endpoints provided by the code execution service; under the hood, the code execution service offers a selection of gRPC endpoints, so the model can simply interact with a particular endpoint depending on our desired outcome. Although this is the most flexible way to interact with code execution, it’s somewhat complicated to handle: there are many edge cases, and ultimately we've found that interacting with these endpoints directly can lead to cluttered code. To circumvent this, we've implemented a series of endpoint abstractions into our Task Engine. Notably, these abstractions cover common use cases: for example, we have an abstraction for running all of the tests in the container's test suite, and another abstraction for running a linter on the source code in the container. We stress that this process is typically iterative, with interactions running across many rounds. For instance, a model may write some code, then run the linter, and then execute the test suite. In fact, we even allow a model to submit new requests before it receives the outcome of prior steps, as this more closely models the patterns that developers typically follow.
We note that there are many details that need to be accounted for in this approach. It’s clear that a single server simply isn't sufficient for a code execution service at our scale; we simply have too many requests in flight at once. This immediately requires that we spin up multiple servers as part of our code execution framework. However, this presents an opportunity: since we will likely have multiple revisions of the same repository active at once, we should ideally deploy all active revisions of the same image to the same server. This is especially useful from the perspective of storage, as we can play some clever tricks with OverlayFS to reduce the amount of storage needed to expose all of the revisions. But this approach is not without its issues. We now need to carefully route requests to the same repository to the right server; but we also need to be careful to make sure that no particular server is overwhelmed with many concurrent requests. This could actually happen in practice, as certain repositories serve as excellent playgrounds during model training. Admittedly, these issues are relatively straightforward to address, but building a robust service for code execution has only been possible because of our ability to iterate quickly over ideas in the Model Factory.
Thank you
We hope you enjoyed this tour of our code execution system at Poolside. Check out our next installment for a deep dive into how we run inference and evaluations at scale.
Acknowledgments
We would like to thank the applied research engineering team at Poolside for their thoughtful comments and suggestions on this post. We would also like to thank the Redpanda team for their continued support and collaboration.